DRAWING CONVERSATIONS
– in collaboration with Daniel Castaño –


Intro to physical computing
DRAWING CONVERSATIONS
– in collaboration with Daniel Castaño –
DRAWING MACHINE
– in collaboration with Daniel Castaño –
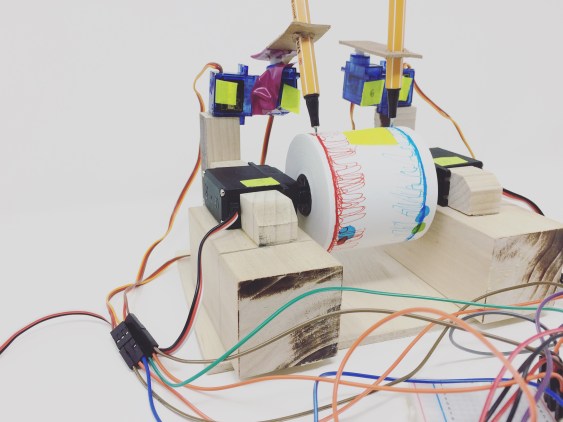
Following our previous prototypes, we decided to continue with the same aesthetic the wood was providing us. This time we made cut and sand precise pieces of wood for our machine, change the cardboard for acrylic and the tape for wood glue and nails. Because of the previous machine, we had a better understanding of the dimensions this final prototype would need. Our idea was not to hide our motors or wires but to keep them on view, take advantage of how colourful they can be, it was an important part of our design.

For the micro servos, we decided to go with acrylic, make pieces that were able to connect them both servos and with the pens. Cardboard was very important for this process, with the laser cut and many tries with cardboard we made sure our measurements were correct and not losing any valuable and more expensive material. All the pieces were thought to fit together through pressure and secured with m2 screws and nuts.

The pens needed to be easy to change and adjust to the servo arm, to be as weightless and simple as possible. We created an arm that would work as a gear or servo horn by itself and to complement it with a nut-screw system for the pen adjustment.


The acrylic connection between the motors was an idea brought up by Daniel Rozin. It took us several attempts to make a functional (complete) one piece, given the properties of the material which bends under heat, we ended up making extra for this process. for one good piece other five didn’t work due to deformity or for the fragility of the piece itself.
The size of the piece was one of the main reason the bending was difficult, a better solution would have been experimenting with 3d printing to adjust the motors and the pieces with levels within the material like the servo motors horns have where the screw goes rather than fitting through pressure. In general, they worked well for our purpose, they didn’t get loose while the servo moved (no matter how aggressive that movement was) nor they felt under the weight of the other components.

With the size of the drawing machine, the dimensions of the Stabilo mini point pens worked perfectly, the basic colours complied with our aesthetic, the trace left on the paper roll was smooth and vivid. The weight of each pen was enough for our micro servo motor arm to not collapse and work well.

For the paper roll, acrylic parts were made off to fit the gears, they fit fine but to make space for these parts the inner roll was cut on the edges of both sides as clean as possible. At the end, the cut didn’t look that nice and our transparent acrylic didn’t help at all. Even though they worked and fitted fine we decided to use the 360° servo motors round horns instead.

Part of the intention of the drawing machine is to record somehow intimate conversations or at least close ones, and even if that doesn’t happen and its all fun gibberish, we knew we wanted them close to the main mechanism and high enough to make less awkward. So, the microphones were installed at a position where they were as high, close and exposed to the mechanism as possible, also as far away from the path of any motor, pen or motor arm.

One thing we were careful while making our connections was to mind the kind of energy each of our components needed. We had 3v, 5v and 12v on our hands. Organizing and labelling the breadboard and wires was key to not fry anything or get lost in all our wires.

We started with simples codes that both of us had from previous projects or from code examples on tutorials (Adafruit’s microphones). Once each component worked on itself we combine them little by little, coming across several issues while writing our code on the way. For example, if we used delays on any motor, those delays were overwritten to all our motors; our 360° servos never stopped whenever we told them to; most of the code was always followed by a physical change in the mechanism; if the degrees on the micro servos didn’t work well we moved the started point of the arm rather than trying to go to the exact position with the code, which made the code change all the time.


Some other little bugs came along, for example, the starting movement of the motors was very aggressive, Daniel was brilliant debugging and made them go as smoothly as possible; the rolling paper go as slow as our motors let us, which allow the pens to draw the peaks of the sounds and the microphones don’t cross each other that much when exposed to the same noise, neither do the arms. A button was added to give the user some control at the beginning and end of the drawings, it also changed the enclosure design a bit.


Using our components as an aesthetic asset was always intentional, show the colourful guts of the machine was important. An acrylic enclosure was planned to hold the connections, support the machine and let the user see through it, but all fade when the weight of the machine was a little too much for a DIY acrylic enclosure, a pair of wooden blocks added to the base helped the structure but hide the Arduino and all our colourful wires in the process, a wood enclosure turned out being a better solution.

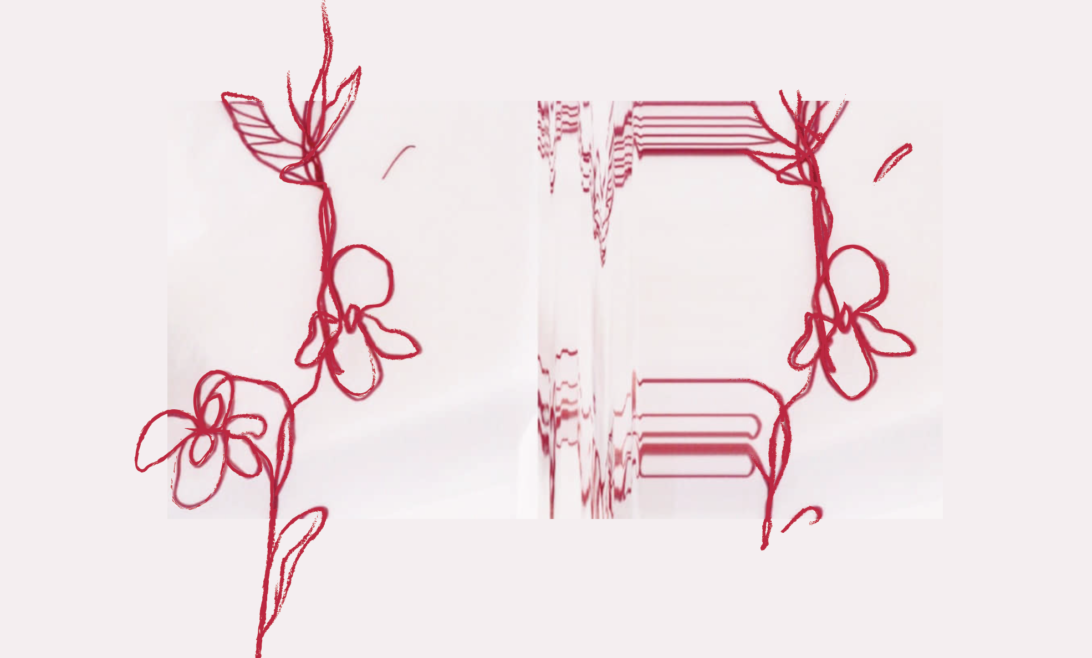
Even though our paper roll can run, we made the deliberate desition of containing it. This was closer to our project references and as a final drawing of someone’s conversation through repetition and noise. For us, these artefacts were not only pleasant and intriguing, they became the leitmotif of the whole effort.

««««««« Post under construction »»»»»»»
DRAWING MACHINE
– in collaboration with Daniel Castaño –
Cardboard, tape and wood prototype
There was an interest from the beginning to make our drawing machine as simple, efficient and budget-friendly as possible, with the paper roll running without much problem on our wood structure, while the main task was to figure how the machine would function properly with all its components, the looks were also very important for us. What works for the deadline? our budget? more components? is this material ok? Because we had many questions we decided that our best course of action was to continue with what we had: glue, tape and cardboard for rapid prototyping. If the code and the structure worked as close as we wanted them to, then we would start cleaning and refining our design.

This prototype had the following materials: Two (2) 360° servo motors – Four (4) micro servos – Two (2) microphones amplifiers – One (1) Paper roll 2 1/4″ – Two(2) Stabilo point pens – One (1) Arduino UNO – One (1) breadboard – Jumpers – Plywood board – Wood board 2 in. x 2 in – Cardboard – Electric tape – Double sided tape – Wood glue.

The biggest issue once we combine all the components was figuring out the degree zero on each micro servo, that piece of information let us know which servo worked better for either the base or the arm. Once we got the degrees we continue with the angles, how far could they go without hitting each other or getting out of the paper roll, this process took a lot of attempts and code debugging.

Another issue we faced was that the base micro servos didn’t work well responding to the microphones at the same time that the arm servos, this meant that once both servos got the signal from the micros, both were moving at the same time. We tried to eliminate this behaviour from the code but the oscillations between the peek of the sounds we always had noise from the base servos. For this time we put them in mute mode while we figure out how to make them work fluidly with the rest of the drawing machine.
Overall our machine was working, the structure itself is very functional and having our electronic components exposed gave it an aesthetic that we appreciate and want to keep exploring. Other discoveries regarding the aesthetic of the drawing machine came from the drawings themselves. While prototyping a lot of repetitions happened (the rolling paper was held in place), noise from the motors (erratic traces), pauses while reloading the code (the ink kept flowing creating little bubbles of colour) and silences (straight traces) from the microphones created artefacts in the drawings.


Final drawing machine materials
Two (2) 360° servo motors – Four (4) micro servos – Two (2) microphones amplifiers – One (1) button – Resistor 220 ohm – One (1) Paper roll 2 1/4″ – Twelve (12) Stabilo point pens – One (1) Arduino UNO – One (1) breadboard – Jumpers – DC Power supply 12 v – M2 x 12mm Screws – M2 Nuts – Screws 1/4 in – Plywood board 12 in x 12 in x 3mm – Wood board 2 in. x 2 in – Acrylic sheet 12 in x 12 in x 3mm – Cardboard – Electric tape – Double sided tape – Magic tape – Wood glue
««««««« Post under construction »»»»»»»
DRAWING MACHINE
– in collaboration with Daniel Castaño –
References and mood


*Brainstorm some concepts for your final project. You don’t have to commit to these, just come up with a few ideas in which you are interested. Include a brief description and an illustration.*
««««««« Post under construction »»»»»»»
– DRAWING MACHINE-
final project concept
I really wanted to create a drawing machine at some point of PCOMP. Based on Pete Prodoehl’s drawing machine, I made my first approach, with most of the materials on hand (wood dowels, electric tape, hot glue, potentiometers, wires, breadboard and an Arduino UNO, only the servo motors were bought), it was a possible task [in theory].
With the materials, a reference and a little understanding of how to write in code on the Arduino IDE, a clumsy drawing machine came to live. The machine had several problems, the fragile fabrication (product of rapid prototyping) made the pen to fall off or to slowly turn diagonally; the weight of the components made the machine to fall on its side or completely apart; the communication between the motors was none existing, making the movements independent from each motor, translating in random, chaotic, Pollock-like kind of lines.


From the beginning, the idea was for the drawing machine to work in a Cartesian space. Figuring out the coming together between the code and the mechanism was a big challenge.
My final project is to continue this endeavour: to build a drawing machine that actually draws under a fluid control from the user.
//
[ types of drawing machines ] (My drawing machine)
[ Inspiration ]

(Jürg Lehni‘ drawing machines)


(Durrell Bishop and Robert Poll’s drawing bot “Line-us“)


*Midterm production assignments.*
««««««« Post under construction »»»»»»»
-BUBBLE PIXELS GUN-


//


*Come up with a simple application using what you’ve learned – week 4 *
««««««« Post under construction »»»»»»»
-DRAWING MACHINE-
Inspired by Pete Prodoehl’s drawing machine I decided to give it a try and create a rapid prototyping version of the machine. Using potenciometers to command the movements of the arm, I reassembled the connection between the servo motors and wrote the code from scratch.


//


*Pick a piece of interactive technology in public, used by multiple people. Write down your assumptions as to how it’s used, and describe the context in which it’s being used.*


Around the world, there is a movement of being more active, more CO2 free and the bike it’s at the centre of this. New York City created a bike sharing program called Citibike sponsored by Citibank, You can see stations everywhere especially in Manhattan. The service is used by locals and visitors, it has become extremely popular so much so that the stations are often the stations are empty, even the city promised more bikes this year. With a city so busy and expensive as New York, one could see why the bikes are a popular alternative, they are a fair alternative for short distances taxi rides or subway commutes.
Citibikes look attractive, despite de big logos from Citibank they have all the basic features desirable in a bike, they are big and flashy. Although I personally don’t think they are pretty they are useful, something that might bother Don Norman and might be the reason why I choose to get my one bike, it was more affordable in the long term, it was attractive and makes me think it works better than the city bikes. Emotion and need made me think that the share bike service is not a good option, but for others, citibikes might be more affordable, functional and pleasurable and good enough for their needs.


I used this service once as a tourist with a friend. It took us a while to get a Day pass, not because the steps were difficult, even knowing English we were slow at understanding what to do next but they were too many, even our debits cards didn’t work and they were Mastercard(sponsor of city bike) at the end the credit card did. We choose some random bikes, waited for the green light (fought with the lock) and got our bikes for the rest of the day. During my observation, this same struggles happened to people who one could say were a tourist or clearly new to the service, these people took more time at choosing their bikes and getting on their way.
The lock was one of the particular interactions that took people by surprise, it took several attempts to either pick it up or to returned. This happened to almost all of the users, although they were cases of people who were more familiar with the service, they were agile and savvy (some had tricks for the lock) with the service and product, which might be the most interesting thing of the observation, see how people make their own tricks or approaches within the interaction. Maybe this responds are a default feature in any human-centred design service or product.

*Come up with a simple application for switches and LED circuits*
I wanted to create a simple mechanism for this assignment, I came with the idea of building a little house where the light would turn on or off it the door was opened or closed. Prototyping fi the house was important, that way I could have an idea of space and volume, especially regarding the dimension needed for the mechanism. Paper was very helpful in order to prototype fast and fix mistakes before using cardboard.


Once the house was made I continued with my switch. I got a cell battery (3v), a cell battery holder, a white LED, some copper tape, and wire. First, I made the connection with some electric tape in order to see that everything was well connected and measured to fit inside the house.


The idea was that between the LED and the cell battery, one of the wires would be cut, leaving it with two ends in a near position from the cooper door. If the door was open (away from the ends) no flow of energy was possible, the circuit was open but if the door was closed (in contact with the ends) the cooper allowed the energy to flow and the led to emit light.

Then, I soldered the parts together and glue them using a hot glue gun. With everything in place, the bottom of the house was closed. Here is the switch house video
//


* PCOMP – first-week assignment *
Going through this assignment, my mind kept coming to the idea that asking “What is interaction?” is oddly similar to the question “What is art?”. Not because I’m implying that they are the same, but that they have the same effect on me. They have this philosophical aura around them and even Chris Crawford had his moment when he mentioned the experimental thought of if a tree falls in the forest. It’s all about perception… but it is not. In theory, we know what its art; everything made by men in order to express or understand the world that surrounds him. But, art depends on the context, and art is not art just because you called art, but because it is (and maybe because a group of people said it is, even though that is contradictory to what I just said). I want to explain the similarity of how big the question could be. But as Chris points out, interaction is the communication between two (actors), that talk, listen and think constantly with each other. Not just something that responds to the other.
That was my definition of interaction. And, I said it was because a response from the other (e.g, light sensors) is not an interaction. I’m not embarrassed to say that Chris Crawford would’ve probably rolled his eyes at me for having art in the equation and not technology in the picture.
So, Interaction is a conversation between a person and an electronic device or a technology. Chris talks about talking, listening, and thinking. Therefore interaction is dialogue, a process that creates a ‘tete a tete’ with technology.
I enjoyed Bret Victor’s critique of how mainstream and narrowed our idea of interaction is. With computers as part of our environment, he embraces the idea of exploration. Physical computing is basic in that exploration, it allows as to search for a clear voice; it is the process through which we learn how to communicate with the technologies or devices, how to think.